As an Amazon Associate I earn from qualifying purchases.
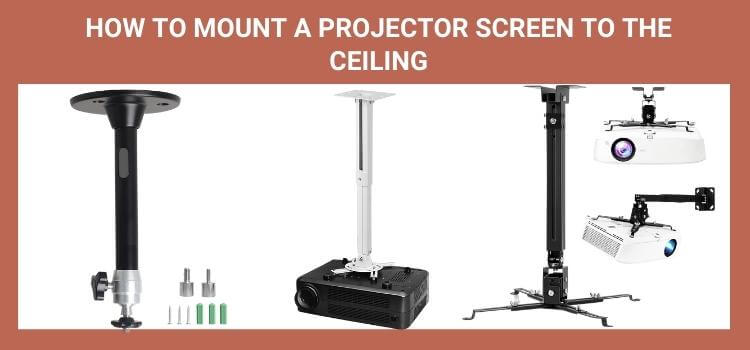
Welcome to our comprehensive guide on how to mount a projector screen to the ceiling. Whether you want to create a home theater or deliver engaging presentations in your office, ceiling mounting a projector screen can provide an immersive experience and save valuable space. From selecting the ideal position to safely installing the net, we will walk you through the procedure in this post. Thus, let’s begin!
How to Mount a Projector Screen to the Ceiling
Here, we’ll walk you through a detailed, step-by-step process for ceiling mounting a projector screen like a pro. Ensure you follow each step carefully to achieve a secure and professional installation.
Gather Your Tools and Materials
Gather all the installation-related equipment and supplies before you start. You’ll need a projector screen, a ladder, a stud finder, a measuring tape, screws and anchors, a power drill, and a level. Having everything at hand will make the process smoother.
Find the Ideal Location
Selecting the right spot for your projector screen is crucial. Consider the room’s layout, the viewing angle, and the distance from the seating area. Ensure the screen is centered and at an appropriate height for comfortable viewing.
Locate Ceiling Joists or Studs
Find the ceiling joists or studs where you’ll secure the screen brackets with a stud finder. Mounting the projector screen to these sturdy structures will ensure stability and prevent accidents.
Measure and Mark the Positions
Measure the distances and mark the positions of the screen brackets on the ceiling. Double-check the measurements to avoid mistakes and ensure a balanced installation.
Install the Mounting Brackets
Install the mounting brackets on the ceiling with the correct screws and your power drill. Make sure they are securely fastened to the studs or joists.
Attach the Screen Case to the Brackets
Now, carefully hang the projector screen’s case onto the mounted brackets. Seek assistance if needed, as projector screens can be heavy and require steady hands.
Adjust the Screen Tension
If your projector screen allows for tension adjustment, use the provided mechanisms to ensure the screen surface is smooth and wrinkle-free.
Test and Adjust the Alignment
Lower the screen gently and check its alignment. Adjust if necessary to achieve a level and centered projection surface.
Conceal Wires and Cables
Tidy up the installation by concealing any visible wires and cables. This not only improves the aesthetics but also reduces tripping hazards.
Test the Projection
Before calling it a day, test the projection to ensure everything works flawlessly. Make any final adjustments as needed for the perfect viewing experience.
The Benefits of Ceiling-Mounted Projector Screens
Ceiling-mounted projector screens offer several advantages, making them appealing for home theaters and presentation rooms.
Enhanced Space Utilization
By mounting the screen on the ceiling, you free up valuable floor space, making the room more versatile for other activities when not using the projector.
Optimal Viewing Angle
Ceiling mounting provides an ideal viewing angle for the audience, reducing neck strain and ensuring everyone has a clear screen view.
Neat and Professional Appearance
Ceiling-mounted screens offer a clean and professional look, enhancing the overall aesthetics of your entertainment or presentation space.
Immersive Viewing Experience
With a ceiling-mounted projector screen, you can recreate the ambiance of a commercial theater, offering a truly immersive cinematic experience.
Necessary Tools and Equipment
Before you begin the installation process, gather the following tools and equipment:
- Measuring tape
- Pencil or marker
- Stud finder
- Power drill
- Screws and anchors
- Level
- Projector screen mounting brackets
- Screwdriver
- Ladder or step stool
Step-by-Step Guide: Mounting a Projector Screen to the Ceiling
Preparing the Workspace
Before you start, ensure the room is clear of any obstacles hindering your work. Remove furniture or cover it with protective sheets to prevent any damage.
Measuring and Marking the Mounting Points
Determine the optimal location for the projector screen using a measuring tape. For a fully immersive viewing experience, please consider the screen size and the sitting area’s proximity. Mark the mounting points on the ceiling with a pencil after choosing the placement.
Installing the Mounting Brackets
Securing the Brackets to the Ceiling
Locate the ceiling joists or beams using a stud finder. It’s essential to attach the brackets securely to the structural support of the ceiling to ensure the screen’s stability. Drill pilot holes into the marked points and attach the brackets using screws and anchors.
Attaching the Projector Screen
Aligning and Securing the Screen
With the mounting brackets in place, lift the projector screen and align it with the frames. Double-check that the screen is level and centered. Once positioned correctly, secure the screen to the brackets, following the manufacturer’s instructions.
Adjusting the Screen Position and Projection Angle
After mounting the projector screen, you may need minor adjustments to ensure a perfectly centered and leveled projection. Most projector screens come with adjustable settings, allowing you to fine-tune the screen’s position and projection angle for an optimal viewing experience.
Concealing Cables and Wiring
To maintain a neat appearance, conceal the cables and wiring from the projector to the source device. Use cable management solutions like cord covers or channels to keep the wires organized and hidden from view.
Tips for Optimal Viewing Experience
- Ensure the projector and screen are compatible in size and resolution for the best image quality.
- Dim the room lights to enhance the projected image’s brightness and contrast.
- Regularly clean the projector lens and screen surface to prevent dust buildup and maintain image clarity.
Troubleshooting Common Issues
Issue: Crooked or Misaligned Image
Solution: Re-adjust the projector screen to align with the mounting brackets.
Issue: Screen Wobbling or Instability
Solution: Check the mounting brackets and screws for any looseness. Tighten them if necessary.
Issue: Blurry or Distorted Image
Solution: Adjust the focus and keystone settings on the projector until the image appears sharp and correctly proportioned.
Maintenance and Cleaning
To prolong the life of your projector screen:
- Perform regular maintenance and cleaning.
- A soft, lint-free cloth may remove Dust and smudges from the screen’s surface.
- Steer clear of employing solid chemicals that might harm the screen’s fabric.
FAQs
Yes, you can mount a projector screen on a sloped ceiling. Some projector screens come with adjustable brackets that accommodate sloped ceilings. Alternatively, you can use wedge-shaped shims to level the screen surface.
Dust a ceiling-mounted projection screen gently using a soft cloth or feather duster. To remove difficult stains, use a light soap solution and a microfiber cloth while avoiding getting the area too moist.
While it is possible to install a ceiling-mounted projector screen on your own, professional installation ensures proper alignment and stability and reduces the risk of damage during installation.
Painting the screen surface is not recommended, as it may compromise the screen’s performance and image quality. Stick to the manufacturer’s guidelines for maintenance and customization.
Yes, you may use a standard projector and screen fixed to the ceiling. To achieve the best picture projection, however, consider the projector’s throw distance and the screen size’s suitability.
Ensure the mounting brackets are securely fastened to the ceiling and the screen tension is appropriately adjusted. Additionally, avoid unnecessary movements around the screen area during projection.
Conclusion: Elevate Your Viewing Experience
Mounting a projector screen to the ceiling is a rewarding project that elevates your entertainment or presentation setup. By following our comprehensive guide, you can confidently achieve a seamless and professional installation. Embrace the immersive experience of a ceiling-mounted projector screen and transform your space into a captivating and enjoyable destination for all.
Related Post
Amazon and the Amazon logo are trademarks of Amazon.com, Inc, or its affiliates.

Leave a Reply